
This blog explains the process of authenticating the users, using Microsoft Azure Active Directory authentication. This blog provides an idea on an Azure AD authentication for a .NET CORE Application, From setting up Active Directory to registering Core application on Azure Active Directory.
This blog will look at:
- What is Azure Active Directory
- How Azure AD authentication functions
- Sign-in scenarios supported by Azure AD
- Web app sign-in flow with Azure AD
- Creation and Configuration of Azure AD to register the MVC Core Web Application
What is Azure Active Directory
Azure Active Directory (AD) is a cloud-based solution for identity management, which provides a rich suite of features on user, group, application, security and many other features among them into one consolidated solution.
How Azure Active Directory Authentication functions
In a normal AD authentication, all the systems/users in a network are a part of the directory and they can access the secured system with their AD credentials. However, Azure handles it with an Active Directory.
Azure creates a default Active Directory for you when you purchase an Azure subscription or an Office 365 subscription or any other Microsoft Service. And we can have multiple AD assigned to single subscription. In order to use Azure AD you must become a “Tenant” within the system. [Multiple subscriptions can trust the same directory, but each subscription trusts only one directory. Subscription automatically gets created when your organization signs up for a Microsoft cloud service subscription, such as Microsoft Azure, Microsoft Intune, or Office 365. An Azure tenant represents a single organization.]
We can also create active directories, and it’s free. Ideally, we should create an Active Directory for each environment. All the users in an Active Directory can consume applications in the respective directory by providing their Azure credentials. Administrator has to create these users under Active Directory. Admin should generate a temporary password for the users, which the users have to change in their first login.
Sign-in scenarios supported by Azure AD
Applications can sign in users themselves or delegate sign-in to an identity provider.
For an identity provider to know that a user has access to a particular app, both the user and the application must be registered with the identity provider. When you register your application with Azure AD, you are providing an identity configuration for your application that allows it to integrate with Azure AD.
Registering the app also allows you to:
- Customize the branding of your application in the sign-in dialog. This is important because this is the first experience a user will have with your app.
- Decide if you want to let users sign in only if they belong to your organization. This is a single tenant application. Or allow users to sign in using any work or school account.
- Request for scope permissions. For example, you can request the “user.read” scope, which grants permission to read the profile of the signed-in user.
- Define scopes that define access to your Web API. Typically, when an app wants to access your API, it needs to request permissions to the scopes you define.
- Shares a secret with Azure AD that proves the app’s identity to Azure AD. This is relevant in the case where the app is a confidential client application. [A confidential client application is an application that can hold credentials securely. They require a trusted back end server to store the credentials.]
Once app is registered, it will be given a GUID that the app shares with Azure AD when it requests tokens.
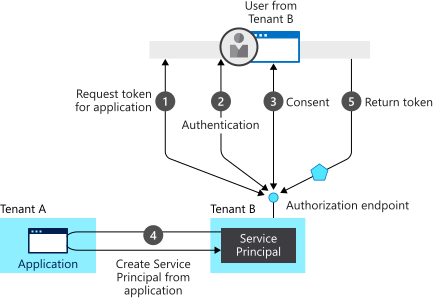
In this provisioning flow:
- A user from tenant B attempts to sign in with the app, the authorization endpoint requests a token for the application.
- The user credentials are acquired and verified for authentication.
- Then the user is prompted to provide consent for the app to gain access to tenant B.
- The Microsoft identity platform uses the application object in tenant A as a blueprint for creating a service principal in tenant B.
- The user receives the requested token.
Web app sign-in flow with Azure AD
When a user navigates in the browser to a web app, the following happens:
- The web app determines whether the user is authenticated.
- If the user isn’t authenticated, the web app delegates to Azure AD to sign in the user. That sign in will be compliant with the policy of the organization, which may mean asking the user to enter their credentials, using multi-factor-authentication, or not using a password at all (for example using Windows Hello).
- The user is asked to consent to the access that the client app needs. This is why client apps need to be registered with Azure AD, so that Azure AD can deliver tokens representing the access that the user has consented to.
When the user has successfully authenticated:
- Azure AD sends a token to the web app.
- A cookie is saved, associated with Azure AD’s domain, that contains the identity of the user in the browser’s cookie jar. The next time an app uses the browser to navigate to the Azure AD authorization end point, the browser presents the cookie so that the user doesn’t have to sign in again. This is also the way that SSO is achieved. The cookie is produced by Azure AD and can only be understood by Azure AD.
- The web app then validates the token. If the validation succeeds, the web app displays the protected page and saves a session cookie in the browser’s cookie jar.
- When the user navigates to another page, the web app knows that the user is authenticated based on the session cookie.
The following sequence diagram summarizes this interaction:
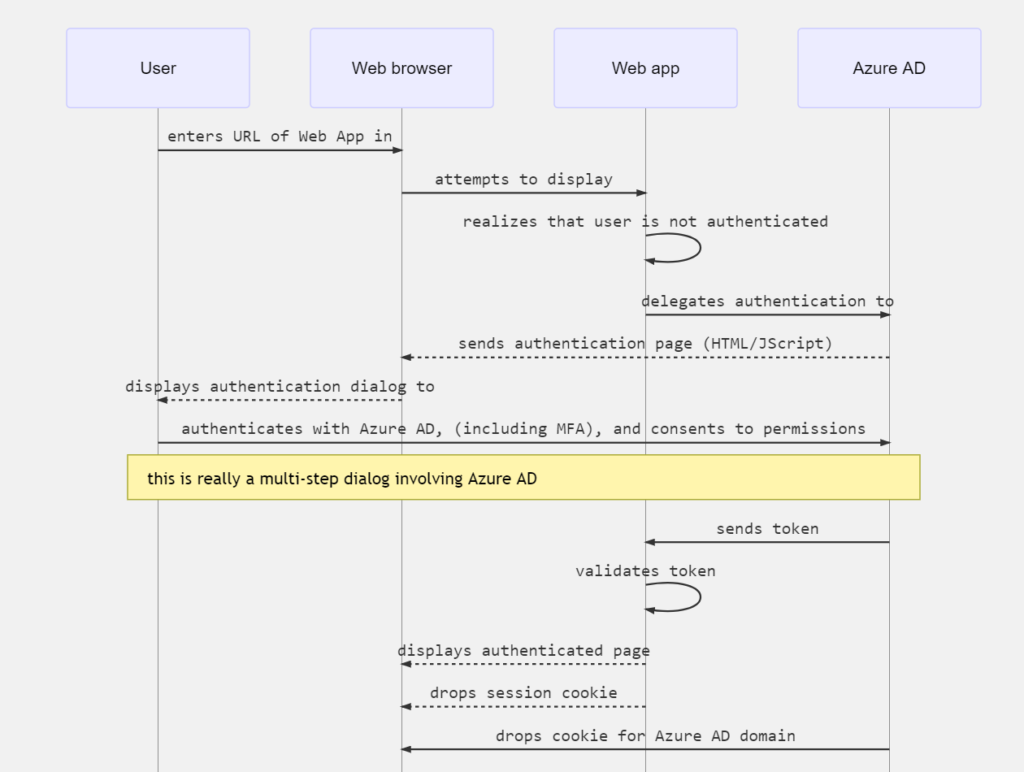
How a web app determines if the user is authenticated with Azure AD
- Web app developers can indicate whether all or only certain pages require authentication. For example, in ASP.NET/ASP.NET Core, this is done by adding the [Authorize] attribute to the controller actions.
- It causes ASP.NET to check for the presence of a session cookie containing the identity of the user.
- If a cookie isn’t present, ASP.NET redirects authentication to the specified identity provider. If the identity provider is Azure AD, the web app redirects authentication to https://login.microsoftonline.com, which displays a sign-in dialog.
Creation and Configuration of Azure AD to register the ASP.NET Core Web Application
Registering applications on Azure AD
We need to register one Web app and one native app in Azure AD directory. For that log in to Azure portal -> Azure Active Directory -> App Registration blade.

Here, you can see the list of applications created earlier. Click on “+ Add” to register a new application.
To register the API,
- Give a user friendly name to your service.
- Select “Web application and / or Web API” for type of application.
- Give Sign-on URL where user can sign-in, which is generally the base URL.
- Click on Create.

Register the native Asp.net core app
- Give a user-friendly name to your service.
- Select “Web application AND / OR web API” for type of application.
- Give Redirect URI where user will be navigated after successful log in.
- Click on Create.

Configure Application on Azure AD
Now, we need to configure the newly registered apps.
To configure the Service App, navigate to Azure Active Directory → App Registrations → Service App → Properties blade → Copy the App ID URI.

Navigate to Azure Active Directory → App Registrations → Select the service App → Required permissions blade → select Windows Azure Active Directory → Select the application permissions & delegated permissions → Save it.

Navigate to Azure Active Directory → App Registrations → Select the service App → Select Keys blade → Generate a key. (Fill Description & expires fields, azure will create a secret key. Copy that provided secret key and save somewhere safely. As you can’t recover it once you leave this blade)

Now we need to allow our client app consume our service application
Navigate to Azure Active Directory → App Registrations → Select the native App → Select Required Permissions Blade → Click on “+ Add” → Select “Select an API” blade → Type name of the service app → azure will auto populate the service → select your service → Click on “Select”

Select “Select Permissions” blade → Give access to “Access <Service_App name>” → Click on “Select” → Click on “Done”

Again back in the permission to the other applications section of configure screen, click on the delegated permission drop down of the newly added service and select “Access <Service_Name>”. And click on save.
Server-side Implementation with ASP.NET Core
Learn more about asp.net core check in https://integrano.com/net-core-why-it-is-good-choice/
Creating a basic ASP.NET Core API with authentication
- Create the ASP.NET Core API app in Visual Studio 2017.
Added NuGet Packages
- Microsoft.AspNetCore.Authentication.Cookies
- Microsoft.AspNetCore.Authentication.OpenIdConnect for authentication.
Changes in the Appsettings to connect to azure active directory
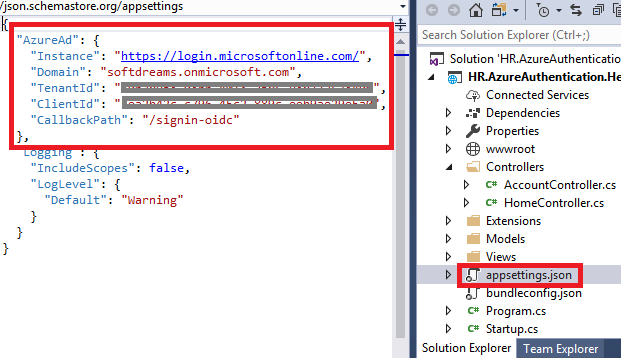
Here we are setting up Open ID Connect authentication middle ware services with:
- Domain
This is the Azure Active Directory tenant name (say, softdreams.onmicrosoft.com). - TenantId
This is the Azure Active Directory ID. To verify the Directory ID, select Azure Active Directory>Properties>Directory ID. - ClientId
Application identifier that Azure AD provides for our application. - CallbackPath
The path where a server will redirect after authentication. We don’t need to create this in our application, the middle ware will handle this.
Setting up Azure AD Authentication in Startup
The core part is the authentication setup. In Startup.cs you will have to setup the authentication using Open Id Connect. As follows:
- Add authentication in the pipeline.
- Configure OIDC.
- Use cookies to sign-in the user.
Add below code in the startup file:
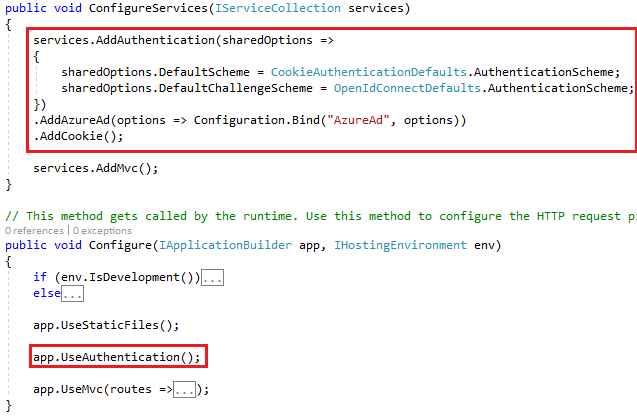
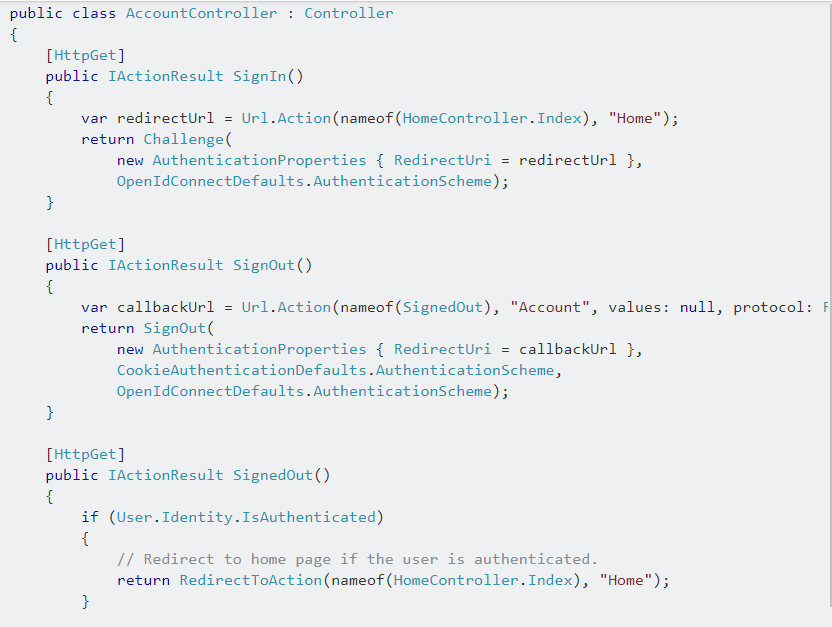
Next step is to setup the application to let the users sign-in. For that add AccountController, with SignIn and SignOut actions. Where SignIn will return a Challenge to the client. so that the challenge response will redirect the user to Azure AD. And for that this will be the Authority I’ve set earlier in configuration. Also set the AuthenticationProperties and more specifically the CallbackPathto be the root of the application, in order to avoid an endless loop of redirections. If I haven’t done that, when the user would be authenticated, he/she would be redirected back here (in /account/signin) and from here back to Azure AD and so on and so forth.
Here is the Accountcontroller to co-ordinate with the authentication operations.
Add the [Authorize(Policy = “Users”)] or [Authorize(Policy = “Admins”)] attributes on the top of the controllers or actions according to your requirements.

Done with coding and it’s time to try out Azure AD authentication.
Wrapping up
In this post, showed basic Azure Active Directory Authentication in ASP.NET Core Web Application using Visual Studio. We needed few additional configuration parameters, some lines of code and small change to login view. To integrate with Azure AD in your ASP.NET Core application, you need to use OIDC and provide the required metadata for the Open Id Connect provider. To sign-in you don’t have to do anything but return a Challenge and as a result sign-in phase will kick in by its own, to return an identity token back to your application, which then can be stored in a cookie to keep the user logged-in for subsequent requests.